Basic MIDI Messaging with Serial From Arduino
A project I'm working on requires the development of a very simple MIDI Controller utilising only buttons to send specific messages to Ableton live. I created a prototype of the requirement using some basic push buttons directly on the breadboard.
First I had to get a better understanding of MIDI and I read an article suggested by the Arduino MIDI Tutorial
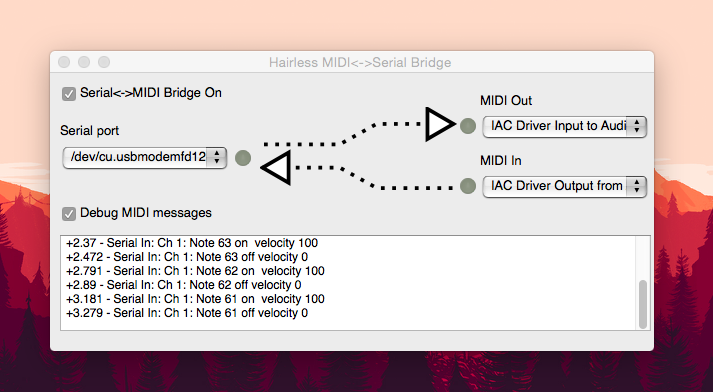
I realised that I couldn't use the Arduino as a MIDI controller without converting the serial data sent from the Arduino into MIDI so that Ableton Live (the app I intended to use the MIDI in) could interpret it. I did a little more searching and found a program which handled this for me called Hairless MIDI to Serial Bridge. There is another app you can use called Serial MIDI Converter which is JAVA based however I found Hairless a lot easier because it included a debugging windows. With Serial MIDI Converter you need to use another program called MIDI Monitor to debug the messages being sent from the Arduino.
The great thing about Hairless MIDI to Serial is that it came with an Arduino library called Ardumidi to handle all the heavy lifting (Isn't the Internet a fantastic place :D). I must admit though I didn't end up using the Ardumidi library because I found an even better option on Github which seemed more complete.
With the Arduino MIDI library I was able to send notes using basic push buttons from the Arduino to Hairless MIDI and finally from that to Ableton Live. I ran into one hurdle with Hairless in that it defaults to Serial comms over BAUD over 115200 which I changed to 57600
I had to look up some notes to MIDI numbers to get a sense of how this actually work since I'm not that musically inclined even though I "try" play guitar. I found this awesome reference with everything needed to make sure I had some decent notes coming from my push buttons. I used notes from the 5th octave from C to G (60 - 68).
Finally I uploaded the sketch to the Arduino and started Hairless to interpret the data from the Arduino as MIDI and sent everything into Ableton Live. It started working as expected!
The Breadboard setup

The Code
#include <MIDI.h>
#include <Bounce2.h>

// Push button start and end pins (only works in sequence)
int button1 = 3;
int button2 = 4;
int button3 = 5;

int bounceDelay = 5;

// Push buttons
Bounce Button1 = Bounce();
Bounce Button2 = Bounce();
Bounce Button3 = Bounce();

// Button state
int button1State;
int lastButton1State;
int button2State;
int lastButton2State;
int button3State;
int lastButton3State;

// LED pins
int led1 = 8;
int led2 = 9;
int led3 = 10;

MIDI_CREATE_DEFAULT_INSTANCE(); // Create an instance of MIDI

void setup() {
  Serial.begin(57600);

  pinMode(button1,INPUT);
  pinMode(button2,INPUT);
  pinMode(button3,INPUT);

  pinMode(led1,OUTPUT);
  pinMode(led2,OUTPUT);
  pinMode(led3,OUTPUT);

  Button1.attach(button1);
  Button1.interval(bounceDelay);
  Button2.attach(button2);
  Button2.interval(bounceDelay);
  Button3.attach(button3);
  Button3.interval(bounceDelay);
}

void loop() {
  Button1.update();
  Button2.update();
  Button3.update();

  button1State = Button1.read();
  button2State = Button2.read();
  button3State = Button3.read();

  delay(5);

  if (button1State != lastButton1State) {
    if (button1State == LOW) {
      digitalWrite(led1, HIGH);
      MIDI.sendNoteOn(61,127,1);  // Send a Note
      delay(100);
      MIDI.sendNoteOff(61,0,1);
      digitalWrite(led1, LOW);
    }
    lastButton1State = button1State;
  }

  if (button2State != lastButton2State) {
    if (button2State == LOW) {
      digitalWrite(led2, HIGH);
      MIDI.sendNoteOn(62,127,1);  // Send a Note
      delay(100);
      MIDI.sendNoteOff(62,0,1);
      digitalWrite(led2, LOW);
    }
    lastButton2State = button2State;
  }

  if (button3State != lastButton3State) {
    if (button3State == LOW) {
      digitalWrite(led3, HIGH);
      MIDI.sendNoteOn(63,127,1);  // Send a Note
      delay(100);
      MIDI.sendNoteOff(63,0,1);
      digitalWrite(led3, LOW);
    }
    lastButton3State = button3State;
  }
}
The great thing about this is that I can essentially build an Arduino powered keyboard. The code here is basically a starting point for a project like this, hopefully I can expand on it to make something more advanced such as a Touch based MIDI Controller which leverages more of the MIDI library's functionality or getting even more complex and making a MIDI Fighter.